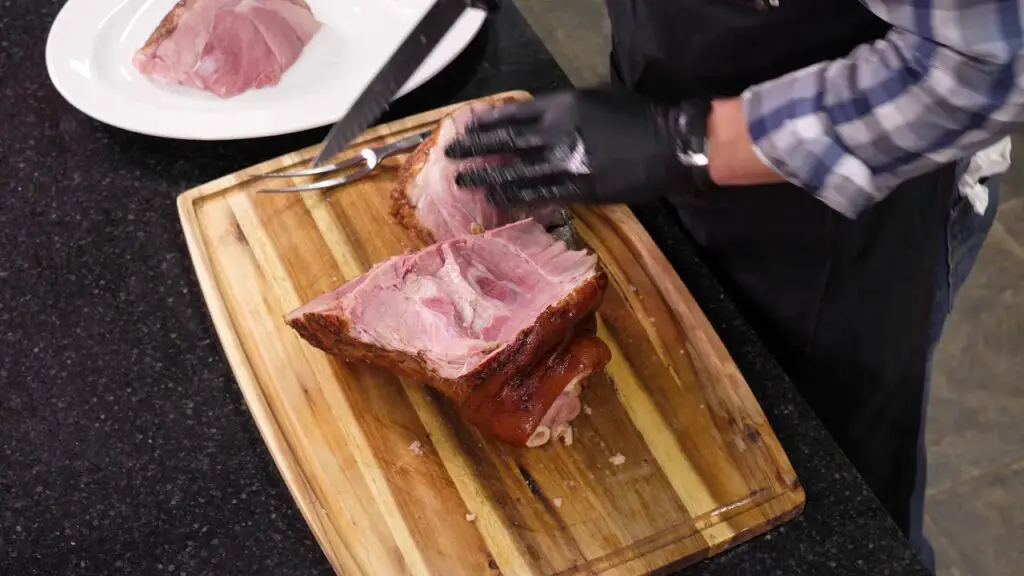
To carve a shank ham, place the thicker piece of meat on top, use a fork to steady the ham, and cut along the top of the bone to loosen the boneless meat. Then, place the meat carved-side down on a cutting board and cut across the grain in perpendicular slices.
Transfer the slices to a serving platter. Carving a shank ham can be a challenging task if you don’t know the right techniques. Whether you’re preparing for a holiday feast or looking to impress your guests, properly carving a shank ham is essential to ensure that you get the most flavor and presentation out of your cut.
In this guide, we will explore the step-by-step process of carving a shank ham, along with tips and tricks to make the process easier and more enjoyable. With the right knowledge and techniques, you’ll be able to carve your shank ham like a pro and impress your friends and family with your culinary skills. So, let’s dive in and learn how to carve a shank ham like a boss!

1. Understanding The Process Of Carving A Shank Ham
Carving a shank ham may seem like a daunting task, but with the right technique, you can achieve perfectly sliced and juicy ham that will impress your guests. In this section, we will explore the importance of carving technique and provide an overview of the steps involved in carving a shank ham.
Introduction To Carving A Shank Ham
Carving a shank ham requires precision and knowledge of the different cuts of meat, which ultimately affects the tenderness and flavor of the ham. Whether you are preparing a holiday feast or simply enjoying a delicious ham dinner, understanding the process of carving is essential.
Brief Explanation Of The Importance Of Carving Technique
The way you carve a shank ham can significantly impact the taste and presentation of the dish. By utilizing the correct technique, you can ensure that each slice is tender, juicy, and evenly cut. Proper carving also helps in separating the boneless portion from the bone, making it easier to serve and enjoy.
Overview Of The Steps Involved In Carving A Shank Ham
Carving a shank ham involves several steps, allowing you to achieve the best results. The following is a simple overview of the process:
- Start by placing the ham with the thicker piece of meat on top and using a fork to steady it. Cut along the top of the bone to loosen the boneless meat.
- Place the meat carved-side down on a cutting board and cut across the grain of the meat in perpendicular slices.
- Transfer the slices to a serving platter, ensuring each slice is arranged neatly and ready to be enjoyed.
Following these steps will yield beautifully sliced ham that is both visually appealing and delightful to taste. It is important to remember to cut perpendicular to the grain of the meat to maintain its tenderness and ensure a flavorful experience for everyone.
Now that you have a better understanding of the process of carving a shank ham, you can confidently bring out the best qualities of this delectable dish. Stay tuned for the next section, where we will dive deeper into the specific techniques and tips for achieving a perfectly carved shank ham.

2. Preparing The Shank Ham For Carving
Before you can start carving your delicious shank ham, it is essential to properly prepare it. This involves positioning the ham correctly on the cutting board, loosening the boneless meat from the bone, and using a fork to steady the ham during carving.
Properly Positioning The Ham On The Cutting Board
Start by placing the ham with the thicker piece of meat facing upwards on the cutting board. This allows for easier carving and ensures the meat stays in place while you work.
Techniques For Loosening The Boneless Meat From The Bone
To release the boneless meat from the bone, use a fork to steady the ham and make precise cuts along the top of the bone. Cutting along the bone ensures that you get as much meat as possible while maintaining the integrity of the ham.
Using A Fork To Steady The Ham During Carving
During the carving process, it’s important to keep the ham steady to achieve even slices. Use a fork to hold the ham in place, ensuring it doesn’t move around while you are carving.
Once the boneless meat has been loosened and the ham is secure, you’re ready to start carving your shank ham. Place the meat carved-side down on the cutting board to make precise perpendicular slices across the grain of the meat. Remember to transfer the slices to a serving platter as you go along.
Carving a shank ham can be a culinary delight, and by following these simple techniques, you can create beautifully sliced ham that will impress your guests. Now that you have mastered the preparation, it’s time to move on to the next step and enjoy the deliciousness of your perfectly carved shank ham.

3. Carving Technique For Shank Ham
When it comes to carving a shank ham, mastering the right technique is essential to ensure perfectly sliced, tender meat. In this section, we will cover the step-by-step process for carving a shank ham to showcase its delicious flavors and make your presentation flawless.
Using A Carving Knife To Cut Across The Grain Of The Meat
Begin by placing the thicker piece of the ham on top and use a fork to steady it. Locate the bone and carefully cut along the top of the bone to loosen the boneless meat. Once separated, place the meat carved-side down on a cutting board.
To achieve optimal tenderness, use a sharp carving knife to cut across the grain of the meat. This technique helps to shorten the meat fibers, providing a more tender and flavorful eating experience. Make sure to keep your strokes smooth and even throughout the cutting process.
Cutting Perpendicular Slices Of The Carved Meat
Now that you have the meat on the cutting board, it’s time to slice it into delicious, bite-sized pieces. Cut perpendicular to the grain of the meat, creating slices that are around 1/4 to 1/2 inch thick. This thickness ensures the slices won’t fall apart while transferring them to a serving platter.
Tips For Transferring The Slices To A Serving Platter
Once you have beautifully sliced the shank ham, it’s time to transfer the slices to a serving platter. Follow these tips to ensure a seamless transfer:
- Use a wide spatula or a pair of tongs to carefully lift each slice from the cutting board.
- Arrange the slices on the platter, slightly overlapping each other for an appealing presentation.
- To prevent the slices from sticking together, you can lightly dust them with flour or cornstarch before transferring them to the platter.
With these simple techniques, you can carve a shank ham like a pro, impressing your guests with perfectly sliced, tender meat. Practice makes perfect, so don’t hesitate to refine your carving skills and experiment with different presentation styles to create an unforgettable dining experience.

4. Carving A Bone-in Shank Ham
To carve a shank ham, start by loosening the boneless meat by cutting along the top of the bone. Then, place the meat carved-side down on a cutting board and cut perpendicular slices across the grain of the meat. Finally, transfer the slices to a serving platter.
Carving a bone-in shank ham requires some technique and precision to ensure you get the most out of your ham. In this section, we will walk you through the step-by-step instructions on how to carve a shank half or portion ham, as well as the techniques for slicing thin, vertical slices across the ham. Let’s get started!
Instructions For Carving A Shank Half Or Portion Ham
To carve a shank half or portion ham, follow these simple steps:
- With the thicker piece of the meat on top, use a fork to steady the ham and cut along the top of the bone to loosen the boneless meat.
- Place the meat carved-side down on the cutting board.
- Cut across the grain of the meat in perpendicular slices.
- Transfer the slices to a serving platter.
These instructions will ensure that you carve your shank half or portion ham efficiently, resulting in perfectly sliced and presented ham slices.
Techniques For Slicing Thin, Vertical Slices Across The Ham
To achieve thin, vertical slices across the ham, follow these techniques:
- Place your carving knife at the shank end.
- Cut thin, vertical slices across the ham.
- Sink the knife all the way down to the bone for maximum effect.
By cutting thin, vertical slices and going all the way down to the bone, you’ll ensure that each slice is flavorful and easy to eat. This technique will impress your guests and make your shank ham the star of the meal.
Remember, when carving a bone-in shank ham, it’s essential to cut all the way down to the bone, ensuring each slice captures the delicious flavors of the ham. So, follow these instructions and techniques for a perfectly carved shank ham that will have everyone coming back for seconds.
5. Carving The Remaining Meat From The Bone
Once you have carved the boneless meat from the shank ham, it’s time to tackle the remaining meat that is still attached to the bone. There are a few different methods you can use to efficiently remove the remaining meat and make the most out of your delicious ham. Let’s explore some of these methods:
Methods For Carving The Remaining Meat Attached To The Bone
- Horizontal slicing technique: To begin, place the shank ham on a stable surface with the bone facing upwards. Take a sharp carving knife and make a horizontal cut into the meat along the length of the bone. This will help loosen the meat from the bone and make it easier to carve.
- Vertical slicing technique: Next, switch to a vertical slicing technique by making perpendicular cuts into the meat, slicing down towards the bone. Be sure to sink the knife all the way down to the bone to maximize the amount of meat you can remove.
- Loosening the meat: Once you have made the vertical cuts, use a fork to gently pry the sliced meat away from the bone. Continue loosening and separating the meat from the bone using the fork and the knife, ensuring you remove as much meat as possible.
Horizontal Slicing Technique For Removing The Meat From The Bone
The horizontal slicing technique is a great method for efficiently removing the meat from the bone. Here’s a step-by-step guide on how to use this technique:
- Step 1: Place the shank ham on a stable surface with the bone facing upwards.
- Step 2: Take a sharp carving knife and make a horizontal cut into the meat along the length of the bone. This cut will help loosen the meat from the bone.
- Step 3: Switch to a vertical slicing technique by making perpendicular cuts into the meat, slicing down towards the bone.
- Step 4: Sink the knife all the way down to the bone to ensure you remove as much meat as possible.
- Step 5: Use a fork to gently pry the sliced meat away from the bone.
- Step 6: Continue loosening and separating the meat from the bone using the fork and the knife.
- Step 7: Repeat the process until you have removed all the remaining meat from the bone.
Tips For Serving The Bone-in Shank Ham
When it comes to serving a bone-in shank ham, presentation is key. Here are a few tips to ensure your bone-in ham looks as delicious as it tastes:
- Use a carving board: Place the carved bone-in shank ham on a sturdy and elegant carving board. This will make it easier for your guests to serve themselves and add a touch of sophistication to your table.
- Serve with condiments: Offer a variety of condiments to enhance the flavor of the ham, such as mustard, cranberry sauce, or a homemade glaze. These additional flavors will complement the savory taste of the meat.
- Garnish with herbs: Sprinkle some fresh herbs, such as parsley or rosemary, over the sliced ham to add a pop of color and freshness.
- Provide serving utensils: Be sure to have a set of tongs or serving forks available for your guests to easily grab their desired portion of ham.
By following these tips and techniques, you’ll be able to carve the remaining meat from the bone of a shank ham with ease, ensuring a beautiful presentation and maximum enjoyment for you and your guests.
Frequently Asked Questions For How To Carve A Shank Ham
How Do You Carve A Precooked Ham?
To carve a precooked ham, place the ham with the pre-cut side down on a cutting board. Use a sharp knife to carve along the bone, removing the boneless section of meat. Slice the boneless section across the grain and transfer to a serving platter.
To carve the remaining meat from the bone, insert a fork next to the bone and make horizontal slices.
How Do You Remove The Bone From A Ham Shank?
To remove the bone from a ham shank, use a sharp knife and cut the length of the ham to the bone. Follow the bone with the knife to loosen the meat, then remove the bone.
How Do You Carve A Half Leg Ham On The Bone?
To carve a half leg ham on the bone, start by using a fork to steady the ham and cut along the top of the bone to loosen the boneless meat. Place the meat on a cutting board carved-side down and cut perpendicular slices across the grain of the meat.
Transfer the slices to a serving platter.
How Do You Score A Ham Shank?
To score a ham shank, start by using a sharp knife to make shallow cuts in a diamond pattern on the surface of the ham. This will help the glaze penetrate and create a decorative look. Take care not to cut too deep into the meat.
Conclusion
To carve a shank ham like a pro, start by loosening the boneless meat with a sharp knife along the top of the bone. Then, place the meat on a cutting board and slice across the grain in perpendicular slices.
For maximum effect, sink the knife all the way down to the bone. By following these steps, you’ll be able to impress your guests with perfectly carved ham. Visit frickmeats. com to learn more.
Related Articles
Insect Invasion: Threat to Utah’s Fir Forests
 Dr Ahsanur Rahman, PHD


